
Transitions between shots
Verification record: Umoupen 0.9.59 build 628 (2026-10-05) · Verification scope
A transition determines how the picture changes between shots. An overlap superimposes the outgoing and incoming pictures; a fade-in or fade-out gradually reveals or removes a picture. These affect the picture, while an audio fade changes volume.
Transitions such as overlaps and fades connect neighboring shots. Set the transition type and length, and record the extra animation frames needed for the connection.
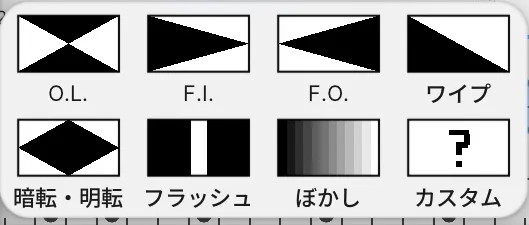
Location: Storyboard Timeline (Storyboard Timeline) → right-click a shot → Add Transition
Basic steps
Section titled “Basic steps”- Right-click the shot before the connection in the Storyboard Timeline.
- Go to Add Transition and choose a type from the list that opens.
- Set Transition type and Length (frames). Use Edit transition in Timeline to edit an existing transition.
When it works: The chosen type’s symbol appears in the Transition row below the Storyboard Timeline.
Transition types
Section titled “Transition types”The Add Transition list holds eight types in two rows.
| List label | Meaning |
|---|---|
| O.L. | Overlap. Overlaps the neighboring shots |
| F.I. | Fade in |
| F.O. | Fade out |
| Wipe | Wipes across the frame into the next shot |
| Dip | Dips to a solid color before the next shot |
| Flash | Flashes brightly at the cut |
| Blur | Blurs from one shot into the next |
| Custom | Specify something none of the above covers |
The list uses abbreviations (O.L., F.I., F.O.), while the printed storyboard uses the full name, such as Overlap.
Wipe shape specifies the wipe’s shape. Fade-in start and Fade-out end specify fade positions.
Main controls
Section titled “Main controls”| Control | Purpose |
|---|---|
| Transition type | Choose a type from the table above |
| Length (frames) | Set the transition length in frames |
| Wipe shape | Choose the wipe shape |
| Fade-in start / Fade-out end | Set fade start and end positions |
| Place transition after cut | Place the transition after the preceding shot |
| Extend incoming head material | Extend the incoming shot’s head material for the transition |
| Transition note | Add a production note to the transition |
| Delete Transition | Remove the transition |
| Edit transition in Timeline | Edit the transition in the Timeline |
Global settings
Section titled “Global settings”Global transition settings controls the default handling of new transitions.
| Control | Purpose |
|---|---|
| Pad new transitions | Add padding to new transitions |
| Pad new transitions to preserve timing | Add padding to preserve overall timing |
| Transition padding | Set the padding in frames |
| Preview transition | Include transitions in storyboard playback |
| Print transition notes in | Choose where transition notes are printed |
The description for using no padding says shot positions stay unchanged, and transitions require extra animation before and after shots.
Printing transitions on the storyboard
Section titled “Printing transitions on the storyboard”Transition panels is in the storyboard panel settings (gear icon). When it is on, the printed storyboard gains one panel-sized cell between shots that carries the transition’s symbol and full name. When it is off, transitions do not appear on the sheet.
Extra animation for transitions
Section titled “Extra animation for transitions”Transitions need material around the join. Extra frames records the required amount for each shot, while Ordered in and Ordered out record the amounts ordered for each side. The built-in description identifies these as extra animation around a shot and describes the requested amount as an optional production note.
| Control | Purpose |
|---|---|
| Extra frames | Extra animation frames required for the shot |
| Ordered in / Ordered out | Frames ordered for each side |
| Requested | Requested amount as an optional production note |
| Set order / Set request | Enter ordered or requested amounts |
| Use minimum / Order minimum | Use the calculated minimum amount |
| Undecided: adopt the calculated minimum | Leave the amount unspecified and use the minimum |
No extra frames needed indicates that no extra frames are required. Minimum unknown indicates that the minimum cannot be calculated.
When a reorder breaks the anchor
Section titled “When a reorder breaks the anchor”A transition is attached to the two shots on either side of it. Reordering or deleting shots can change what it is attached to. Expected neighbour and Current neighbour show the discrepancy, and one of the following resolves it.
| Control | Purpose |
|---|---|
| Accept new neighbour | Rebind the transition to the current arrangement |
| Keep unresolved | Leave it undecided |
| Keep as instruction | Keep it as a production instruction rather than a transition |
Missing shot indicates that the shot it referenced is gone. An Instruction only transition carries no artwork or duration.
Placement and material
Section titled “Placement and material”| Control | Purpose |
|---|---|
| Offset from shot start | How many frames into the shot the transition sits |
| Frames before anchor | Frames taken ahead of the anchor point |
| Endpoint held | Hold the endpoint frame to extend playback time |
| Project edge / Project end | How the edge of the project is treated as a neighbor |
| Print note in | Choose where the note is printed |
When material is short, the shortfall is reported by stage as Preview short by N frames, Order short by N frames, or Delivery short by N frames. min +N frames and available +N frames give the required minimum and what is currently available. Some types or shapes report Preview unavailable for this type or shape.
When something is missing or does not work
Section titled “When something is missing or does not work”- A message says extra animation is required for transitions before export: Material is missing around the join. Check Extra frames and arrange the incoming and outgoing amounts.
- The overlap is shorter than requested: The message states that shot length limits the overlap to N frames. The neighboring shots’ lengths limit the overlap.
- Overall timing changes: Use the option to pad new transitions to preserve timing in Global transition settings.
- Hands-on verification on build 568 confirmed the entry point, the list of types, placement in the Transition row, and how transitions appear on the printed storyboard.
- Length (frames), Wipe shape, Fade-in start / Fade-out end, Global transition settings, and the extra-animation ordering controls are based on the implementation and built-in translations; their on-screen locations and results remain unverified.
Related articles
Section titled “Related articles”Verification
Section titled “Verification”- Hands-on verified: Checked and captured the displayed panel or menu in the installed app. The Transition submenu offers fades, a wipe, fade to/from black, flash and other transitions. The published image is a faithful crop of the source screenshot.
- Unverified: Verification covers only the interface shown in the image. All article procedures, effects of setting changes, exported file contents, saving/reopening and the Windows version were not reverified in this capture session.