
Project types and creating a new file
Verification record: Umoupen 0.9.59 build 628 (2026-10-05) · Verification scope
A project is the unit of work for a creation in Umoupen. Its project mode identifies the kind of work: a single drawing, a book with pages, animation over time, or a storyboard made of shots.
Choose a mode that fits your work, then create a new Umoupen file. See Raster and Vector for the difference between the initial layer types.
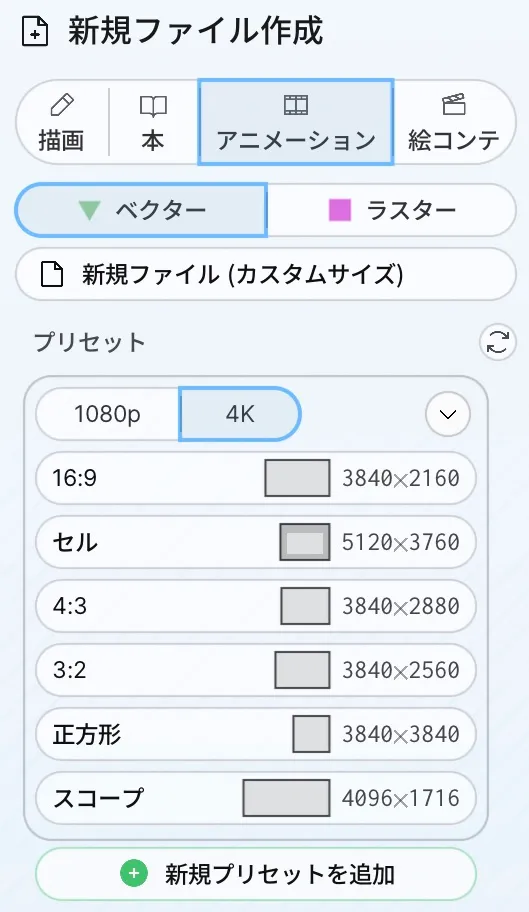
Location: File → New File
Shortcut (macOS): ⌘N
Shortcut (Windows): Ctrl+N
Basic steps
Section titled “Basic steps”- Open New File from File.
- Choose the Drawing, Book, Animation, or Storyboard tab for your project.
- Choose Vector or Raster, then choose a preset to create the file. For a size not in the list, use New File (Custom Size).
Main options
Section titled “Main options”| Option | What it does |
|---|---|
| Drawing | A single image. Endless, A4 (2480 × 3508), A3 (3508 × 4961), Letter (2550 × 3300), Postcard (2400 × 1600), Sketch (2048 × 2048), 4K (4096 × 4096), and 8K (8192 × 8192) |
| Book | Manga (3000 × 4500), US Comic (3975 × 6150), Euro BD (5040 × 6960), Webtoon (1600 × 4600), Storybook (3000 × 2400), 6x9 Book (1800 × 2700), A5 (1748 × 2480), Notebook (2480 × 3508), and US Letter (2550 × 3300) |
| Animation | 16:9 (1920 × 1080), Cel (2560 × 1880), 4:3 (1440 × 1080), 3:2 (1620 × 1080), Square (1080 × 1080), and Scope (2048 × 858). Switch between 1080p and 4K above the list |
| Storyboard | The same six presets and 1080p / 4K switch as Animation |
| Vector / Raster | Sets the format of the first layer |
| New File (Custom Size) | Lets you enter the Width and Height directly |
| Add New Preset | Adds your own preset to the tab’s preset list |
The sizes are as shown on the build 596 screen. Animation and Storyboard sizes are the values with 1080p selected.
For a storyboard, choose a preset on the Storyboard tab.
A file created with Endless on the Drawing tab has an infinite canvas: you can draw beyond the output frame. Use zones or the camera frame to set the area to export.
Resize the Stage after creating the file
Section titled “Resize the Stage after creating the file”In Settings, open File → Resize Stage.
| Option | What it does |
|---|---|
| W / H / Lock aspect | Sets the width and height and locks the aspect ratio |
| Anchor / From center | Sets the point from which the Stage expands |
| Scale contents | Scales the contents together with the Stage |
| Stretch / Fit / Fill | Sets how the contents fit the new dimensions |
| Crisp / Smooth / Binary | Sets the raster resampling method |
| Fit to Stage / Done / Cancel | Fits to the current bounds, applies the change, or cancels it |
Drawing areas for shots and symbols
Section titled “Drawing areas for shots and symbols”Each shot can have its own Stage Size. Resizing the current shot changes that shot’s drawing area. When Use Cameras is off in the export settings, the shot is exported at this Stage Size.
Document Size is the size used for playback and combined export. It is also the starting Stage Size for future shots created with Add Shot. Changing Document Size does not resize existing shots.
While the file has one shot, resizing that shot also changes the size of image and video exports. When the file has several shots, resizing a shot leaves Document Size unchanged.
When editing a symbol, resizing targets that symbol’s drawing area. Before changing a value, check whether it applies to the current shot, the symbol being edited, or Document Size.
Related articles
Section titled “Related articles”Verification
Section titled “Verification”- Hands-on verified: Checked and captured the displayed panel or menu in the installed app. New File offers Drawing, Book, Animation and Storyboard modes with size presets. The published image is a faithful crop of the source screenshot.
- Unverified: Verification covers only the interface shown in the image. All article procedures, effects of setting changes, exported file contents, saving/reopening and the Windows version were not reverified in this capture session.