
Rulers and drawing guides
Verification record: Umoupen 0.9.59 build 628 (2026-10-05) · Verification scope
A drawing ruler is a guide that determines a line’s direction or shape. Enabling Snap makes Brush or Pen strokes follow that guide. Available guides include lines, perspective rays, curves, grids, and symmetry axes.
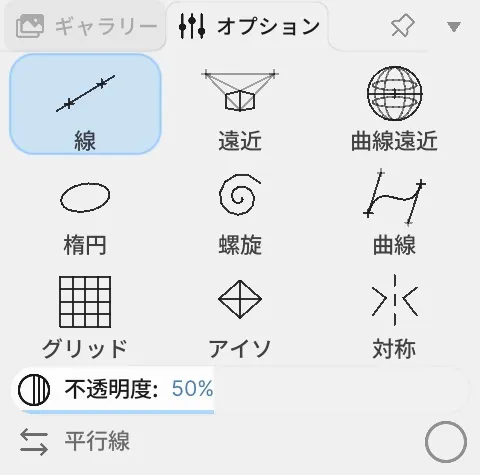
Location: Left toolbar → Ruler Tool / Options on the right
Shortcut: R (Ruler Tool)
Basic use
Section titled “Basic use”- Select Ruler Tool in the left toolbar (
R). - Choose a ruler type in Options and place it on the Stage.
- Turn Snap on and draw with Brush or Pen.
Strokes follow the ruler with snapping enabled. Lower Opacity to make the guide lines fainter.
Place one-point or two-point perspective rulers
Section titled “Place one-point or two-point perspective rulers”A vanishing point is where parallel lines receding into depth converge in the image. One-point and two-point perspective use different numbers of these points. A perspective ruler is completed by clicking its most recently placed point again.
- One-point perspective: Place the first point, then click the same point again.
- Two-point perspective: Place the first and second points, then click the second point again.
Example: draw board seams on a platform
Section titled “Example: draw board seams on a platform”Add board seams to the platform beneath the cat. With Snap enabled, the four Pen strokes follow the same vanishing point.
Options panel controls
Section titled “Options panel controls”| Option | What it changes |
|---|---|
| Line / Perspective / Curvilinear / Ellipse / Spiral / Curve / Grid / Iso / Sym | Ruler type. |
| Opacity | Opacity of the ruler lines shown on the Stage. |
| Parallel | Uses a line ruler as a parallel-line guide. |
| Ray Density | Density of guide rays in a perspective ruler. |
| Horizontal / Vertical / Both | Guide-ray direction for a curvilinear ruler. |
| Golden | Uses a golden spiral. |
| Snap | Guides Brush or Pen strokes along the ruler. |
| Clear | Removes the current ruler. |
While using the Ruler Tool, press Alt+Shift+1 through 9 to select one of the nine types, Alt+Shift+0 to turn the ruler on or off, and Shift+R to clear it.
Clear the ruler
Section titled “Clear the ruler”Use Clear or Shift+R to remove the current ruler.
Save rulers on a layer
Section titled “Save rulers on a layer”- Create the ruler you want to use.
- Use Save to Layer or Save to Folder to save it to the destination.
- Use the ruler badge on the destination to adjust visibility and snapping.
A layer or folder can store multiple rulers, with snapping active for one ruler at a time. Drag a ruler badge to another layer to move it.
Related articles
Section titled “Related articles”Verification
Section titled “Verification”- Hands-on verified: Checked and captured the displayed panel or menu in the installed app. These icons select the ruler type, with an opacity control below. The published image is a faithful crop of the source screenshot.
- Unverified: Verification covers only the interface shown in the image. All article procedures, effects of setting changes, exported file contents, saving/reopening and the Windows version were not reverified in this capture session.