
Camera shake
Verification record: Umoupen 0.9.61 build 648 (2026-10-15) · Verification scope
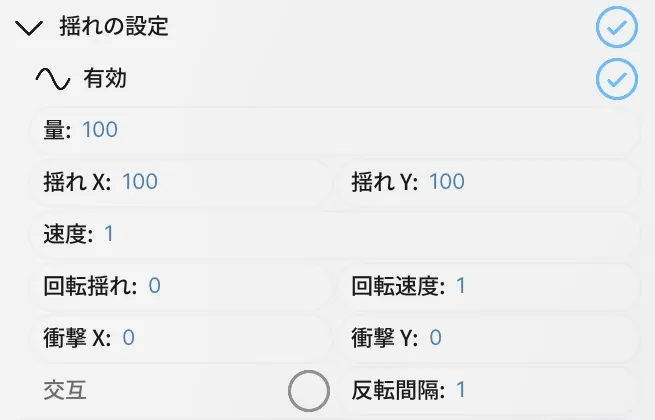
Add position or rotation shake to the camera’s framing. Combine it with camera keys to change the amount of shake between frames.
Location: Select the camera box on the Stage → Options → Shake settings
Open Shake settings
Section titled “Open Shake settings”- Create a Camera layer.
- With the Move tool, click the camera box on the Stage.
- Expand Options → Shake settings.
- Turn Enabled on and set Amount, or Shake X and Shake Y. Double-click a number to open its input field.
- Use Play From Camera to check the camera framing.
Amount sets both shake axes in output pixels. Entering 100 in the example set both Shake X and Shake Y to 100. For a horizontal-only comparison, set Shake Y to 0.
Selecting a camera row in the timeline and selecting the camera box on the Stage are different operations. If Shake settings is missing, select the box again with the Move tool.
Settings and where to check them
Section titled “Settings and where to check them”| Option | Value it controls |
|---|---|
| Enabled | Enable or disable shake |
| Amount | Shake amount for both X and Y |
| Shake X / Shake Y | Shake amount per axis |
| Speed | Shake speed |
| Roll / Roll Speed | Rotation shake amount and speed |
| Impact X / Impact Y | Position offset per axis |
| Alternate / Flip Frames | Settings for reversing the shake direction |
On the Stage, orange boxes appear alongside the selected camera box. Check the final framing through camera playback. With moving character artwork, also check background positions to distinguish camera shake from the character’s movement.
Playback comparison
Section titled “Playback comparison”The character animation is hidden. Both clips retain the background’s existing gradual transformation; enabling shake adds movement of the whole camera view. X/Y are 100, Speed is 1 and Roll is 0. Both clips show the same cropped area of camera playback.
Disabled
Section titled “Disabled”Enabled
Section titled “Enabled”Change shake over an interval
Section titled “Change shake over an interval”Shake values interpolate between camera keys. After setting them, move to another frame and check the Shake curve and current values. Choose the frame to edit before changing values, then play the result to check for shake outside the intended interval.
If shake is not visible
Section titled “If shake is not visible”- Current values: Check that the shake amount is not zero at the current frame.
- Where you check: Use camera playback as well as the regular Stage view.
- Target layers: When using a Camera Folder, place the artwork to shake inside it.
- Export: Check the camera setting in Export options.
Related articles
Section titled “Related articles”Verification
Section titled “Verification”- Hands-on verified: Added a camera layer and opened Shake settings from Move options. Setting Amount to 100 set X/Y to 100. Checked the orange bounds, changing values within the keyed interval, and different frames in camera view. In the capture copy, hid the character and retained the background’s existing transformation. Camera playback of about 4.6 seconds with shake disabled and enabled showed additional movement of the whole camera view when enabled.
- Unverified: A phase-aligned same-frame comparison, effects of every setting, and export. Saving/reopening and Windows behavior were not reverified.