
Reading the Timeline
Verification record: Umoupen 0.9.63 build 677 (2026-11-01) · Verification scope
Use the Timeline to choose which frame on which layer you want to edit. Layers run vertically and time runs horizontally. See Frames, drawings, cels, and exposures for the distinction between units of time, artwork, and the intervals in which artwork is shown.

Layer rows are on the left and the frame ruler is above them. The vertical blue band marks current frame 1; the horizontal blue span and its diamond endpoints mark a tween.
Location: Panels → Show Panels → Timeline
Basic layout
Section titled “Basic layout”| Area | Meaning |
|---|---|
| Rows on the left | Layers. Each layer has one row. |
| Numbers at the top | Frame numbers. Divisions in seconds are also shown. |
| Cell | The position where a layer and frame intersect. |
| Blue cell | The currently selected layer and frame. |
| Vertical position indicator | Shows the current playback position and playback range. |
| Buttons at the bottom | Control playback, add or duplicate frames, adjust exposure length, and perform other actions. |
Click the cell you want to edit.
The cell turns blue, and drawing and frame operations now apply to that layer and frame.
Drag to select a range of cells. You can then move, copy, cut, paste, reverse, clear, or delete the selection.
Drag selected frames to create a loop
Section titled “Drag selected frames to create a loop”Select several drawings and drag the selection handle to the right to create a cycle that repeats their sequence.
- Turn on the arrow button (Simple Select Mode) at the bottom left of the Timeline. Timeline Selection: Simple appears when you switch to it.
- Drag horizontally from the middle of a drawing’s cell to select the range to repeat. The selection snaps to whole drawing exposures.
- Drag the return-arrow handle at the bottom right of the selection to the right.
- Release at the desired length. Create Cycle repeats the same drawing sequence through the extended interval.
After selecting

After extending by 9 frames

In this example, the three drawings in frames 5–13 repeat in frames 14–22, still held for three frames each. Later drawings on A move nine frames to the right.
If the handle is missing, check that Simple Select Mode is on. To begin selecting a range, drag from the middle of a cell, avoiding its right edge, which changes exposure length.
Layer rows on the left
Section titled “Layer rows on the left”Only the states available to a layer appear beside its name.
| Control | What it does |
|---|---|
| Expand / Collapse | Expands or collapses the contents of a folder |
| Clipping Mask / Effects | Shows and toggles clipping and indicates whether effects are present |
| Use Camera View | Shows contents from outside a Camera Folder while keeping only the Camera selectable |
| Solo / Lock / Show | Shows the layer alone, locks editing, or shows and hides the layer |
| Mute Audio Layer | Mutes an Audio Layer |
| 100% | Sets the volume of an Audio Layer |
You can rename a layer in place. Drag a row vertically to reorder it, or drag a folder’s time interval horizontally to move its Folder Timing.
Time ruler and markers
Section titled “Time ruler and markers”| Control | What it does |
|---|---|
| Start / End | Sets the animation playback range |
| In / Out | Sets the range used for the current Shot |
| Lock Animation Length / Lock Shot Length | Locks the endpoint or Shot duration |
| Frame Flags | Adds a named flag to any frame; the right-click menu offers Add Flag, Rename Flag, and Delete Flag |
| Search | Searches layer names from the magnifying glass at the top left; press Return for the next result or Shift+Return for the previous one |
Controls at the bottom of the Timeline
Section titled “Controls at the bottom of the Timeline”| Control | What it does | Details |
|---|---|---|
| Previous Frame / Next Frame | Moves to the surrounding frames | Move through time |
| Frame Roller | Steps through surrounding drawings in a larger view | Timeline thumbnails, Frame Roller, and range linking |
| Play Animation | Plays the animation | Playback, looping, and playback range |
| Shorten Frame / Extend Frame | Shortens or extends the displayed duration | Change exposure length and position |
| New Frame / Duplicate Frame | Adds a blank drawing or duplicates the current drawing | Blank and duplicate frames |
| Clear Frame / Remove Frame / Delete Frames | Removes contents, cells, or time ranges as needed | Split, clear, remove, and delete frames |
The following display and editing toggles also appear on the left. Some are hidden when the Timeline is narrow.
| Group | Main controls |
|---|---|
| Create and display | New Layer / Folder, Onion Skin, Thumbnail View, Timeline Tracking, Layer Names, Orientation |
| Frame Edit | Multi-Frame Edit, Frame Edit, Mark Groups, Frame Flags |
| Interpolation | Tween Editor, Curve Editor, Keyframe Editor, Advanced Tween Keying / Simple Tween Keys, Add Tween Keyframe, Capture 3D Camera Key |
| Storyboard | Storyboard Timeline, Add Shot, Previous Shot / Next Shot, Caption Mode, Shot Options |
| Audio | Monitor Audio, Monitor Audio Muted, Audio Scrubbing On / Off, Monitor Volume |
| Layout | Timeline Zoom, Collapse / Expand Timeline, Move Timeline to Top / Bottom, Short Layers (Half Height / On), Auto Height (Fit Layers) |
| Color | Extend Layer Colors, which blends enabled layer label colors into Classic timeline frame fills |
At the left end of the bottom row are Project Notes, which handles Timesheet notes, and Note Select, which selects a note. Notes and note categories are covered in Read and use the Timesheet Timeline.
Some controls may be hidden through Customize Toolbar. See the relevant article for detailed frame operations. For storyboard controls, see Reading the Storyboard Timeline.
Move the Timeline to a separate display
Section titled “Move the Timeline to a separate display”Use Separate Timeline Window to move the Timeline or Timesheet into its own window and place it on another display. The build 581 official announcement lists F9 as the default shortcut. If it does not respond, check the current assignment under Keybinds.
The build 581 announcement described the detached window as a work in progress with some features missing. If a needed operation is unavailable in the detached window, return to the regular Timeline.
When you right-click a cell
Section titled “When you right-click a cell”The available items depend on the selected range and layer type.
| Purpose | Items |
|---|---|
| Move | Copy / Cut / Paste Frames, Reverse Frames, Copy / Paste Tween Keys |
| Create | New Blank Frame, Duplicate Frame, Split Frame |
| Remove | Clear Frame, Delete, Remove, Clear Tween Keys |
| Timesheet | Renumber From First Label / Renumber From…, Re-sequence From First Drawing / Re-sequence From…, Duplicate Drawing Independently, Unexposed Drawings, Notes |
| Convert to a Symbol and reuse | Convert Selection to Symbol |
If you cannot find the Timeline
Section titled “If you cannot find the Timeline”Choose Panels → Show Panels → Timeline from the top menu.
View drawings as thumbnails
Section titled “View drawings as thumbnails”Press Shift+T to show a drawing thumbnail inside each cell. Press it again to return to the standard view.
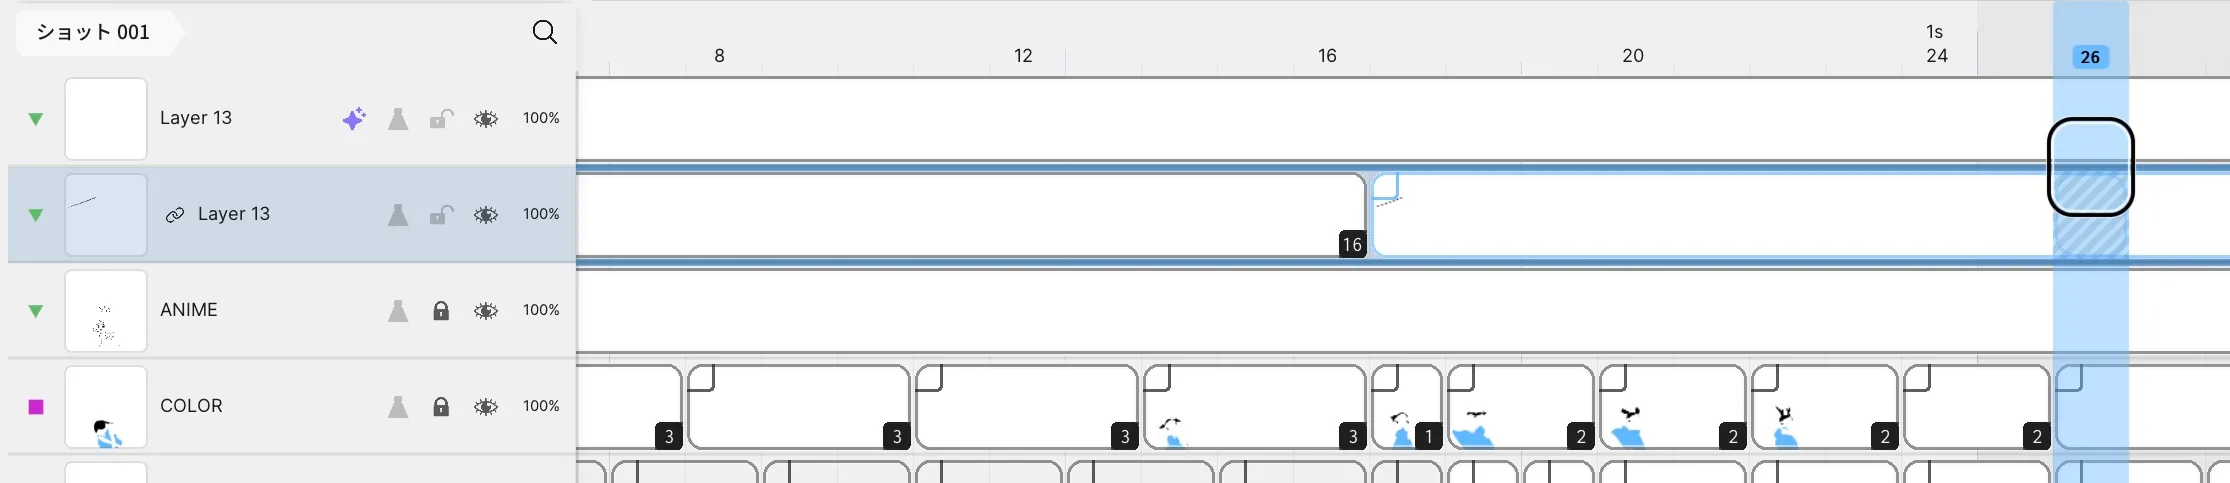
See Timeline thumbnails, Frame Roller, and range linking for guidance on choosing between thumbnails, Frame Roller, and animation range linking.
Related articles
Section titled “Related articles”Verification
Section titled “Verification”- Hands-on verified: Turned on Simple Select Mode in the regular Timeline and dragged from the middle of cells to select frames 5–13 on vector layer A in Symbol 9. Dragging the return-arrow handle at the bottom right repeated the three drawings, each held for three frames, in frames 14–22. Later drawings moved nine frames to the right. The cycle handle was absent in Precise selection and appeared after switching to Simple selection.
- Hands-on verified: Compared the girl in live screenshots at frames 5, 8 and 11 with frames 14, 17 and 20 and confirmed the matching drawings. Ran normal playback, saved with Command+S, closed the tab and reopened it; the cycle display and the repeated drawing at frame 14 remained. The saved file contains an 18-frame cycle referencing the three drawings, and the next drawing starts at frame 23 instead of frame 14.
- Unverified: Checked only the single vector layer, actions and saved result described above on build 677. The full article, applying cycles to multiple layers together, raster and Smart Fill layers, reverse and ping-pong playback, resizing an existing cycle, export, Windows and iPad were not verified.
- Evidence records: F-20261101-513