
Add audio to a storyboard
Verification record: Umoupen 0.9.59 build 628 (2026-10-05) · Verification scope
An audio track is a row for arranging audio clips over time. An audio fade changes volume gradually: a fade-in rises from a low volume, and a fade-out falls to a low volume.
Place music or dialogue audio on the audio tracks of the Storyboard Timeline, then check the sound and timing during storyboard playback. Audio tracks belong to the whole storyboard instead of to individual shots, so the audio you place keeps playing across shot boundaries. You can lay one song under every shot, as you would for a music video storyboard.
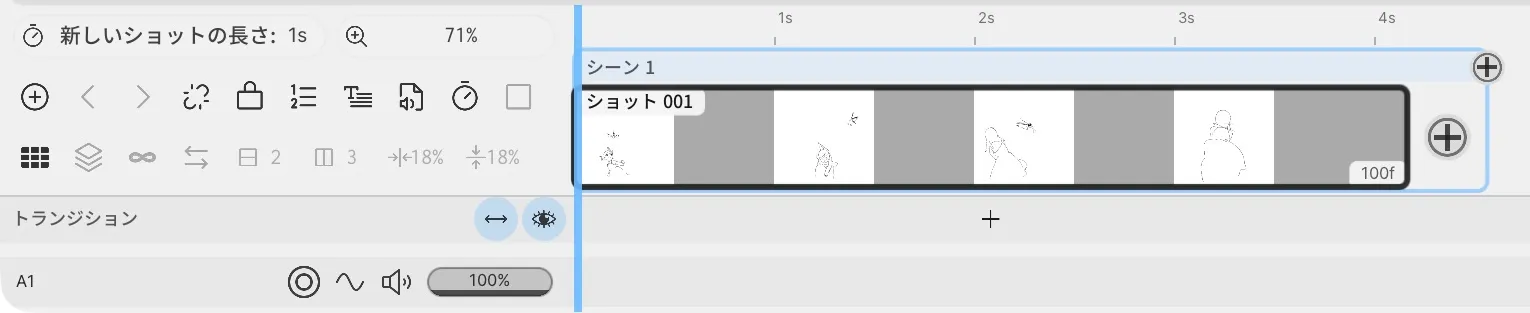
Adding an audio track places an A1 row below the shots.
Location: Storyboard Timeline → Add Audio Track in the top-left toolbar / Right-click an audio track row / Record button on an audio track row
Basic steps
Section titled “Basic steps”- Turn off Caption Mode.
- Press Add Audio Track in the toolbar at the top left of the Storyboard Timeline. An audio track row such as
A1appears below the row of shots. - Right-click the audio track row, choose Import Audio, and pick an audio file.
- Drag the clip into position, then drag its edges to trim its length.
- Check the playback sound with Mute and the volume on the track row.
Main options
Section titled “Main options”When you right-click an audio track row:
| Option | What it does |
|---|---|
| Rename Track | Renames the track |
| Import Audio | Picks an audio file and places it on that track as a clip |
| Add Audio Track | Adds one more audio track row |
| Delete Empty Track | Deletes a track that has no clips |
When you right-click an audio clip:
| Option | What it does |
|---|---|
| Split Clip | Splits the clip in two |
| Volume | Sets the volume of that clip |
| Delete Audio Clip | Deletes the clip |
Drag a clip to change its position or move it to another track. Drag an edge to trim it, or drag the curve along its top edge to adjust the fade. You can select and delete several clips together.
Record from a microphone
Section titled “Record from a microphone”For scratch dialogue and similar audio, you can record straight onto an audio track.
- Move the playhead to where the recording should go.
- Press the record button on the audio track row (Record audio on this track). The message “Recording audio. Press the red button to stop.” appears.
- Press the same button again (Stop audio recording) to stop.
When recording stops, “Audio recorded” appears and the recording is added to that track as a clip. The audio is saved in the project’s audio folder.
The first time you record, Umoupen asks for microphone access. If access is not allowed, you see “Allow microphone access to record”, or a prompt to allow it in macOS System Settings → Privacy & Security → Microphone. Recording is unavailable during an Online Session.
If you cannot add an audio track
Section titled “If you cannot add an audio track”You cannot add audio tracks while Caption Mode is on. Hovering over the toolbar button shows “Turn off Caption Mode to add audio tracks”. Turn off Caption Mode, then add the track.
- The current interface shows audio editing as disabled during an Online Session.
Related articles
Section titled “Related articles”Verification
Section titled “Verification”- Hands-on verified: Checked the displayed interface in installed build 628 and published a faithful crop. The paper-and-note button in the upper-left toolbar adds an audio track. This capture shows the resulting empty A1 row and its audio controls. An empty A1 audio track was added to the working copy and its displayed row was checked.
- Unverified: Verification is limited to the captured interface and the actions described above. All article procedures, setting effects, output files, saving/reopening and Windows behavior were not reverified.