
Visibility, locking, and Solo
Verification record: Umoupen 0.9.59 build 628 (2026-10-05) · Verification scope
Choose which layers are visible and which can be edited.
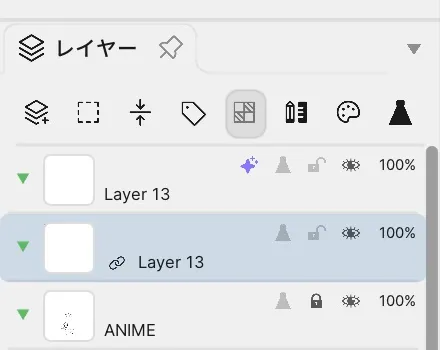
Location: Layers panel → visibility, lock, and Solo controls on each layer row
Shortcut (macOS): ⇧V (Toggle Layer visibility) / ⇧L (Toggle Layer Lock)
Shortcut (Windows): Shift+V (Toggle Layer visibility) / Shift+L (Toggle Layer Lock)
Basic use
Section titled “Basic use”- Find the target layer in Layers.
- Toggle its eye icon, Lock, Solo, or Draft state as needed.
Main options
Section titled “Main options”| Option | What it does |
|---|---|
| Visibility | Shows or hides the layer on the Stage and in standard output. |
| Lock | Prevents accidental editing. |
| Solo | Shows the target layer by itself. |
| Draft Layer | Marks rough work so it can be excluded under export conditions. |
| Lock Transparent Pixels | Prevents drawing in transparent areas of a raster layer. |
Toggle visibility and locking from the icons on each layer row. Right-click the target layer to toggle Draft and Lock Transparent Pixels.
Keep other layers faint while using Solo
Section titled “Keep other layers faint while using Solo”While Solo is enabled, you can adjust the opacity of the other visible layers. At 0%, those layers are hidden; at 100%, they keep their normal opacity. An intermediate value keeps the surrounding layout visible while emphasizing the Solo layer.
- Enable Solo on the layer you want to inspect.
- Use the other-visible-layers opacity slider shown in the Layers or Timeline row.
- Confirm that the Solo layer stays at its normal opacity while the other layers use the selected amount.
Related articles
Section titled “Related articles”Verification
Section titled “Verification”- Hands-on verified: Checked and captured the displayed panel or menu in the installed app. The lock icon in the ANIME layer row identifies its locked state. The published image is a faithful crop of the source screenshot.
- Unverified: Verification covers only the interface shown in the image. All article procedures, effects of setting changes, exported file contents, saving/reopening and the Windows version were not reverified in this capture session.