
Move and transform artwork
Verification record: Umoupen 0.9.59 build 628 (2026-10-05) · Verification scope
A transform changes artwork’s position, size, angle, or skew. Choose Contents to move selected artwork or Layer to move an entire layer. The point used as the center of a transform is called its anchor or pivot.
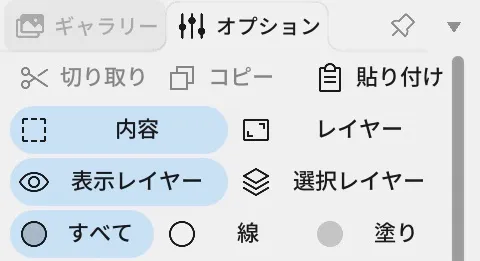
Location: Left toolbar → Move Tool → selection box on the Stage / Options on the right
Shortcut: V
Basic use
Section titled “Basic use”- Select Move (
V). - Choose Contents in Options and select the artwork to move. A box appears around the selection.
- Drag the artwork to move it. Drag a corner of the box to scale, or a little outside a corner to rotate.
- Press
Enterto commit the transform.
To move several strokes together, select the area with the selection tools first.
Move, scale, and rotate examples
Section titled “Move, scale, and rotate examples”These examples show moving, scaling, and rotating the selected character linework. Each example starts from the same state.
In this example, drag the selected line art to the right. The fills on another layer stay in their original position.
Drag the round bottom-right handle outward to enlarge the selection. In this example, the opposite top-left corner stays fixed.
Rotate
Section titled “Rotate”Place the pointer a little outside a corner and drag when the rotation arrow appears. Dragging the round handle scales the selection, so check the cursor shape first.
Options panel controls
Section titled “Options panel controls”Before selection, Options shows the target layers and stroke/fill selection settings. After selection, it shows commands for moving, transforming, and arranging the selection.
Choose what to select
Section titled “Choose what to select”| State | Option | What it changes |
|---|---|---|
| Before selection | Visible Layers / Selected Layers | The layers searched for artwork: every visible layer, or the layers selected in the timeline. |
| Before selection | All / Lines / Fills | Whether lines, fills, or both can be selected. |
| Before selection | Stroke / Split / Points / Slice | Selects whole strokes, a stroke section up to its intersections, or individual points / slices the selected artwork into a piece you can move. |
| Before selection (vector) | Move Connected / Stroke Select Length | The range of connected curves moved together. |
Move, transform, and arrange
Section titled “Move, transform, and arrange”| State | Option | What it changes |
|---|---|---|
| Before selection | Snap Alignment / Move by Bounds / Cmd/Ctrl Move | Snaps to other objects / lets you move from anywhere inside the bounds / uses Move while you hold Cmd/Ctrl on another tool. |
| After selection | Flip H / Flip V / Order / Align | Mirroring, stacking order, and edge or center alignment. |
| After selection | Anchor X / Y / Opacity / Tint | Transform origin, opacity, and color tint. |
| After selection | Move to Front / Move to Back / Horizontal / Vertical | Changes stacking order and horizontal or vertical alignment. |
Scale a raster selection
Section titled “Scale a raster selection”| State | Option | What it changes |
|---|---|---|
| After raster selection | Scaling Filter: Crisp / Smooth / Clean | Pixel interpolation used while scaling. |
| After raster selection | Integer Scaling | Snaps scaling to whole multiples such as 1x, 2x, and 3x. |
Symbol settings
Section titled “Symbol settings”| State | Option | What it changes |
|---|---|---|
| After symbol selection | Loop / Once / Bounce / Stop / Start Frame / Animations | How the symbol plays (repeat, once, back and forth, or stopped), the frame inside the symbol where playback starts, and animation selection. These appear when the selected symbol has 2 or more frames inside; Animations appears when the symbol has more than one animation. |
| After symbol selection | Edit in Place / Show in Gallery / Break Apart | Edits the contents, shows the source asset, or separates the instance. |
| After symbol selection | Recursion Limit / Reset Transform | Limits nested display depth / restores the transform. |
Use the selection elsewhere
Section titled “Use the selection elsewhere”| State | Option | What it changes |
|---|---|---|
| After selection | Export As Image / New Brush / Move to New Layer | Saves an image, creates a brush, or moves the selection to another layer. |
The handles for moving, scaling, rotating, and skewing appear on the selection box on the Stage.
Move a whole layer
Section titled “Move a whole layer”In Options, choose what to move: Contents or Layer. The switch does not appear when a layer that cannot be moved as a whole, such as a camera layer, is selected.
| Option | What moves |
|---|---|
| Contents | The drawing on this layer. |
| Layer | The whole layer, moved, turned, and scaled about its pivot. Layers that follow it come along. |
Visible Layers / Selected Layers and Move by Bounds appear for both Contents and Layer and share one setting. What they do depends on what you are moving.
| Option | With Contents | With Layer |
|---|---|---|
| Visible Layers | Picks artwork from every visible layer. | Press any visible drawing to pick its layer and move it. |
| Selected Layers | Picks artwork only from the layers selected in the timeline. | Only the selected layers move; other drawings are left alone. |
| Move by Bounds | When on, drag anywhere inside the selection bounds to move it. | When on, drag anywhere inside the layer’s box to move it. When off, press its drawing to move it. |
With Contents, Visible Layers / Selected Layers is hidden while a folder is selected.
With Layer, Animate appears next. When on, dragging adds a key at the current frame. When off, dragging changes the layer’s rest pose for values that have no keys.
For keying whole-layer motion, see Tween.
Repeat the same transform on another selection
Section titled “Repeat the same transform on another selection”- Select artwork and move, scale, rotate, or skew it.
- Press
Enterto commit and register the transform. - Select the other artwork that should receive the same transform.
- Press
Enteragain and confirm that the same position, scale, and angle deltas were applied.
The command does nothing when there is no suitable selection or no recorded transform to repeat.
Related articles
Section titled “Related articles”Verification
Section titled “Verification”- Hands-on verified: Checked and captured the displayed panel or menu in the installed app. The upper Move Options select Content or Layer, layer scope and line/fill targets. The published image is a faithful crop of the source screenshot.
- Unverified: Verification covers only the interface shown in the image. All article procedures, effects of setting changes, exported file contents, saving/reopening and the Windows version were not reverified in this capture session.